
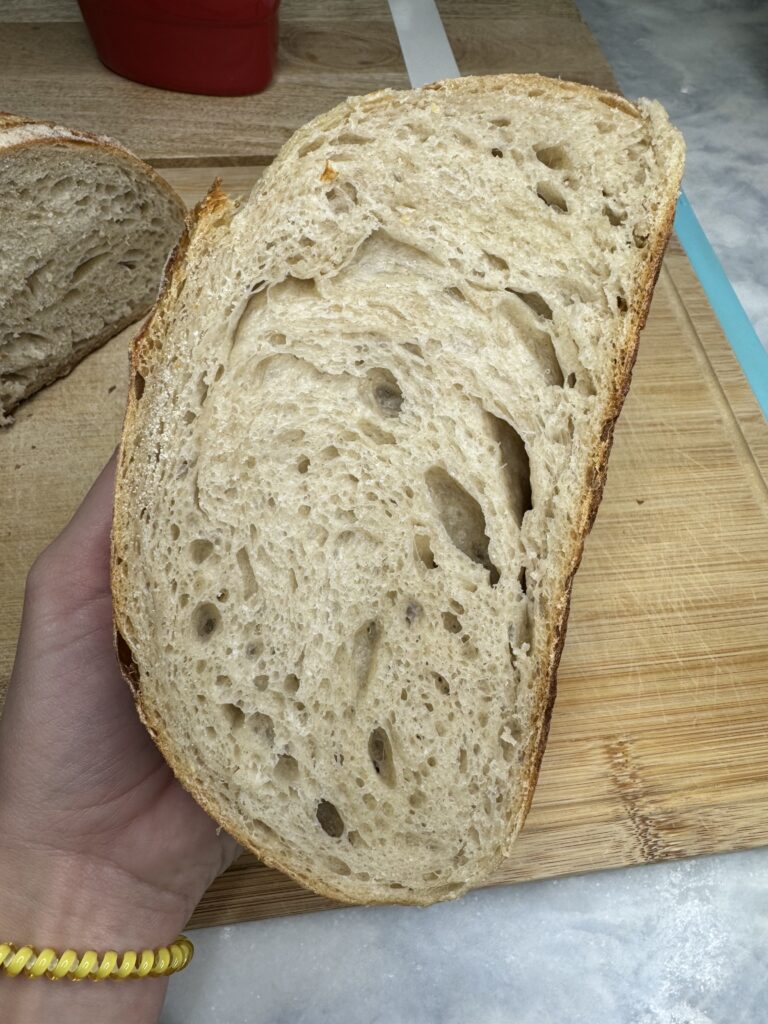
Sourdough bread, with its rustic crust and tangy flavor, is a staple in many households. But did you know that you can create this delicious bread from scratch right in your own kitchen? It all starts with a sourdough starter – a natural leavening agent that captures wild yeast and beneficial bacteria from the environment. In this guide, we’ll explore the step-by-step process of cultivating a thriving sourdough starter right in your kitchen. With patience, observation, and a little TLC, you can cultivate a lively starter that will serve as the foundation for countless loaves of delicious, homemade sourdough bread. So roll up your sleeves, gather your ingredients, and embark on this deliciously rewarding adventure!
**Making a starter from scratch can take a while, depending on the environment of your kitchen. If you’re short on time, new to baking, or just want to simply speed up the process, consider purchasing my personal thriving sourdough starter here. You can start baking bread within just four days with it! This is an excellent choice for beginners & a well-established starter.
Whatever you do, don’t be intimidated by sourdough! I have broken it down step by step and am always available to answer any of your questions! Just shoot me a DM on Instagram. It is SO easy to make and you just need to be patient.
BE SURE TO SAVE THIS RECIPE TO YOUR FAVORITE PINTEREST BOARD FOR LATER!
Why You Should Be Eating Sourdough
- Easy to Digest – The bacteria-yeast composition will start to breakdown the starches found in the grains before it even reaches your stomach!! Most of the work is done before you consume, making it much easier on your gut.
- Lower Glycemic Index – Sourdough is fermented in a way that depletes bad starches within it. Your blood sugar won’t rise drastically upon eating it.
- Better for Gluten Sensitivity – The longer fermentation time for sourdough bread means that much of the protein gluten is broken down into amino acids before you consume it.
- Provides Healthy Bacteria – Sourdough bread is fermented in a way that fosters more beneficial bacteria in the bread and in your body when you eat it.
- Made with 3 Simple Ingredients – Unlike store bought breads, real sourdough contains only 3 clean ingredients. Flour, water, and salt. And when you make it from scratch there are no preservatives or nasty oils!!!
- Macros & Nutrients – Sourdough is packed with nutrients, healthy carbs, protein, fiber, iron and vitamins like potassium, folate & vitamin B. It is not crazy high in calories either.
- Sustainable – Another reason why I love making my homemade sourdough from scratch is because it is better for the environment/more sustainable! I try to reduce my paper & plastic use as much as possible. I store my bread directly in my Dutch oven with the lid on my counter!
You Can Now Purchase My Personal Sourdough Starter
My personal, well established sourdough starter is available to purchase here! Buying a starter will speed up the process significantly, and guarantee that you will have a strong starter for an amazing loaf!
What You Will Need:
- 50g organic bread or all-purpose flour (both work but bread flour is typically preferred because it has a higher protein content than all-purpose. More protein = more structure)
- 50g warm filtered water (80-85 degrees) – Do not use reverse osmosis or distilled water
- Large mason jar – make sure it is large because your starter will GROW! Mine is 32 ounces.
- A scale – to measure out your flour and water.
- Silicone spatula – for mixing your sourdough starter. Try to avoid anything metal. Stainless steel is ok, but silicone is preferred and will not mess with the structure of the sourdough starter.

Organic Bread Flour
All-purpose works too, but bread flour has a higher protein content. More protein = more structure.
Large Mason Jar
For your sourdough starter
Scale
A handy dandy scale for measuring! Grams are more accurate than cups when it comes to baking things like bread and they are super cheap.
Silicone Spatula
This is my favorite tool to mix my starter with. Try not to use anything metal.
Instructions
- Mix the flour and warm filtered water in your mason jar until fully incorporated (it needs to be mixed very well!).
- Cover loosely with the mason jar lid. Do NOT tighten the lid. Store on the counter left unbothered for 24 hours. If your kitchen is cold, try storing it in the oven with the light on. Don’t accidently turn your oven on though hehe!
- Discard about half of what is in the jar (discard as in throw it away – do not keep discard until your starter is established). Taking some out (discarding) allows for the healthy bacteria to grow & helps prevent overflowing. Feed it again 50g flour & water. Cover loosely with the lid and leave it alone for another 24 hours.
- Repeat this process every 24 hours for 4-5 more days and on day 6 or 7 (can vary depending on your kitchen environment), it should very very bubbly and consistently doubling in size every time you feed it.
- Use your starter in your bread when it is at its peak after feeding (a little more than doubled in size. This takes about 5 hours after feeding). I will include pictures below of what this looks like.
What Your Starter Should Look Like When It Is Ready
Your sourdough starter is ready for use when it has doubled in size (or a little more than doubled) and appears bubbly with a dome shape on top. This typically takes about 5 hours in my kitchen after feeding, which is around 74°F.
Once the top starts flattening out, that means the starter is starting to fall back down.
I mark where my starter is at with a rubber band after feeding it to easily see how much it has grown by.
To make sure it your starter is ready to be used, perform the float test. Drop a little bit of the starter in a bowl of water. If it floats, it’s ready! If not, you need to wait a little bit longer before using.
When Can I Keep My Sourdough Discard?
You can keep your discard as soon as your sourdough starter is established and it is consistently doubling in size every time you feed it. If you save the discard from when you are getting your starter established, it has too much bad bacteria in it and you can get sick.
Steps For Feeding Your Starter Before Making Your First Loaf
- If your starter has been stored in the fridge, let it get to room temperature.
- In a mason jar, combine 100 grams of starter (discard any extra starter you have left. Save your discard in a separate jar in the fridge for discard recipes!), 100 grams of warm filtered water (80-85 degrees F), and 100 grams of organic bread flour (or whichever flour you use for your starter – some people use all purpose, whole wheat, rye, etc. There’s no wrong answer, just keep it consistent).
- Mix until you have a thick paste and the flour is fully incorporated.
- Gently place the lid on top (don’t press it all the way down/screw it on) and let it sit for 5 hours on the counter, or until doubled in size.
How to Care for your Starter
Caring for a sourdough starter is akin to looking after a child hehe; it requires attention & care to thrive. If you’re away from home, you can have someone “babysit” your starter or you can dehydrate it for preservation. Typically, a starter stored in the fridge needs feeding every 7-10 days, whereas one kept at room temperature requires daily feeding. For convenience and manageable growth, refrigeration is recommended unless daily sourdough recipes are planned.
I store mine in the fridge on a regular basis since I only make 1 loaf per week. Make sure you let your starter get to room temperature before feeding it if you store it in the fridge.
Now How Do I Actually Make Sourdough Bread?
Click here for my fool-proof, easy to follow sourdough bread recipe.
Sourdough Bread Essential Tools
Here are the essential tools you should get to make sourdough bread!
Sourdough Starter Kit
A kit like this from Amazon is great to get your basic essential tools!
Dutch Oven
To bake your bread in. This is the exact one I have. You don’t need a fancy Le Cruset or anything!
Silicone Bread Sling
Optional, but I try to be as sustainable as possible and love this sling! Or you can use parchment paper.
Large Mason Jar
For your sourdough starter
Scale
A handy dandy scale for measuring! Grams are more accurate than cups when it comes to baking things like bread and they are super cheap.
KitchenAid Mixer
You don’t have to have one, but it sure makes it easy when you are initially mixing your dough. If you don’t have one or it’s out of your price range you can mix your dough by hand with the dough whisk that comes in a sourdough starter kit.
Check Me Out on Social Media
I post all my recipes on social media as well and you can stay up to date on what I am up to! Also, I love seeing people try my recipes! When make these, snap a picture, and share it to your socials. Tag @cookingkatielady and #cookingkatielady so I can admire your masterpiece and share with others!
How to Make a Sourdough Starter
Sourdough bread, with its rustic crust and tangy flavor, is a staple in many households. But did you know that you can create this delicious bread from scratch right in your own kitchen? It all starts with a sourdough starter – a natural leavening agent that captures wild yeast and beneficial bacteria from the environment. In this guide, we'll explore the step-by-step process of cultivating a thriving sourdough starter right in your kitchen. With patience, observation, and a little TLC, you can cultivate a lively starter that will serve as the foundation for countless loaves of delicious, homemade sourdough bread. So roll up your sleeves, gather your ingredients, and embark on this deliciously rewarding adventure!

Ingredients

Instructions
-
Mix the flour and warm filtered water in your mason jar until fully incorporated (it needs to be mixed very well!).
-
Cover loosely with the mason jar lid. Do NOT tighten the lid. Store on the counter left unbothered for 24 hours. If your kitchen is cold, try storing it in the oven with the light on. Don't accidently turn your oven on though hehe!
-
Discard about half of what is in the jar (discard as in throw it away - do not keep discard until your starter is established). Taking some out (discarding) allows for the healthy bacteria to grow & helps prevent overflowing. Feed it again 50g flour & water. Cover loosely with the lid and leave it alone for another 24 hours.
-
Repeat this process every 24 hours for 4-5 more days and on day 6 or 7 (can vary depending on your kitchen environment), it should very very bubbly and consistently doubling in size every time you feed it.
-
Use your starter in your bread when it is at its peak after feeding (a little more than doubled in size. This takes about 5 hours after feeding). I will include pictures below of what this looks like.
Nutrition Facts
Servings 1
- Amount Per Serving
- Calories 100kcal
Note
Did you make this recipe?
The next time you make it, snap a picture, and share it to your socials. Tag @cookingkatielady and #cookingkatielady so I can admire your masterpiece and share with others!:)
Please note that my nutrition label is approximate and can have slight rounding.